This is brought to you by www.howdoesshe.com . Give it a try, it may suprise you!


Pumpkin Roll Recipe
Roll
1 cup sugar
1 tsp. soda
3/4 cup flour
2/3 cup pumpkin (canned- not pie filling, pure pumpkin)
3 eggs
1/2 tsp. cinnamon
1/2 cup walnuts (optional- I exclude them cuz I’m not a fan of walnuts)
Mix everything except nuts.
Grease & wax cookie sheet.
Pour into pan & sprinkle nuts.
Bake 15 min. at 375 degrees.
Roll into T-towel for about 10 minutes.
Unroll & spread in filling.
Filling
8 oz. cream cheese (250g)
1 tsp. vanilla
1 cup powdered sugar
2 tbsp. soft butter
Mix well.


I was making 2 rolls when I photographed this (you only need one tea towel).


When I was at University, I had a roommate who gave me her recipe for a pumpkin roll… I loved it!!! Several times I made it and while it was good, something was off about it. Eventually I figured out that I had written “tbsp” instead of “tsp” for baking soda… oops 

Now that that problem has been solved, I bring you the perfect pumpkin roll recipe! It’s not just me who loves it- we have had bidding wars at church dessert auctions over this thing. Even my husband (who doesn’t like pumpkin) loves it. People are always asking me for it, so I thought it would be an appropriate thing to share with you as we enter this Autumn season.
Here’s the recipe:
Roll
1 cup sugar
1 tsp. soda
3/4 cup flour
2/3 cup pumpkin (canned- not pie filling, pure pumpkin)
3 eggs
1/2 tsp. cinnamon
1/2 cup walnuts (optional- I exclude them cuz I’m not a fan of walnuts)
Mix everything except nuts.
Grease & wax cookie sheet.
Pour into pan & sprinkle nuts.
Bake 15 min. at 375 degrees.
Roll into T-towel for about 10 minutes.
Unroll & spread in filling.
Filling
8 oz. cream cheese (250g)
1 tsp. vanilla
1 cup powdered sugar
2 tbsp. soft butter
Mix well.
…and because if you’re like me, and you hadn’t tried a “roll” before this one, I thought you might want a visual & a few little tips from someone who has made this several times… I photographed the whole process for you:

This is the grease & wax part (wax paper first, then grease). I crease the wax paper around the edges so that it stays in place better, like this:

(which helps the shape of the cake-ish part of the roll)… also, grease it really really well (it’s not cool when the cake won’t come off of the wax paper).

Now pour your mixture onto the pan & smooth it out so that it fills the pan like so:

…and you’re ready for baking. Keep an eye on it near the end of the baking time- you want it a bit brown- if it turns black… you’ve gone too far!

Once you’ve got it out of the oven, you’re at the flip stage. I usually put the pan down first, then a tea towel, then an upside down pan. (I was using my other pan this time, so I used a lunch tray- but you get the idea). Grab hold of the whole thing (with oven mitts on!) and flip it over onto the cool tray.

Congratulations, you pulled off the flip! (are you still with me?) I threw the above picture in for you in case it helps illustrate the order of things (I’ve now removed the pan I cooked it in, and we’re ready to remove the wax paper).
Carefully pull the wax paper away- you really don’t want your cake to stick to the wax paper or start to come apart- this part is really important (that’s why I wanted you to grease your wax paper really well).
…oh, and now you know what my other pan was busy doing (did you notice the tea towel switch?)I was making 2 rolls when I photographed this (you only need one tea towel).

Next you’re going to roll up the end of your tea towel (as shown above) and then continue rolling- with the cake and the tea towel. Do this carefully- the cake can crack at this stage if you’re not gentle with it.

Leave your roll sitting like that for 10 minutes so that it’ll cool before you spread your filling in. You can mix your filling during this time.

Unroll (careful that the cake doesn’t stick to the tea towel & get pulled apart). Plop the filling on top.

Spread it around- almost to the edges, but you don’t have to quite go all the way or it’ll just goosh out when you roll it again.
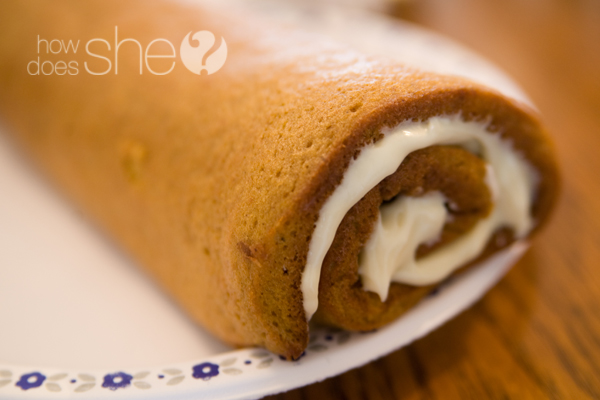
Re-roll it & voila!
Wait ’til you taste it… I’m in love with the filling!
Comments
Post a Comment