This diy comes from www.bontempsbeignet.blogspot.com. Enjoy making a few of these for a neat holiday window display.


Faux Sneaux Flakes
As a person who always seems to get scammed out of a good birthday (November 20th) with one of those combined birthday/Christmas gifts, I know how poor Thanksgiving feels to be overlooked every year. But this year, I have to say "Sorry Sucka!!!!" to Thanksgiving (well, the decorating part at least) to make way for some fun, wintry Christmas decor. That's right kiddos, I'm startin' early. And what's the best kind of seasonal decor? The FREE kind.

Last year I showed you how to make 6 point and (those non-anatomically correct) 8 point snowflakes, and I'm back again with a more detailed tutorial. Because, 1) I've misplaced most of my flakes from last year and have to stock up again, 2) I've been getting a TON of google search hits for paper flakes, and 3) cuz it's cheap as all get out and don't we all like that? Yes, I thought you would agree. See, that's why we're friends. Cheap people unite!Here's how ya do it...
Take a plain ol piece of printer paper (8.5x11")

...and fold it in half.

On the folded side, find your center mark...

...by folding it in half again and pinching the bottom corner.

Just pinch the corner, like this (see on the lower right?)...

I drew a little line so you can see where the center mark is...

Now fold the bottom corner up from that center point so that your bottom right corner is now pointing up near the top left corner

Press down to create a fold.

Then do the same with your lower left corner.
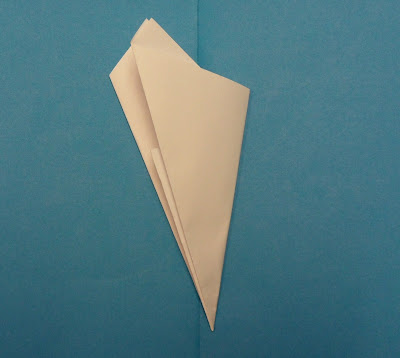
Fold that up to meet the top right edge.

Then fold that in half.

It will look like this...

Now you'll want to trim the excess.
See that short piece in there? You want to cut off everything that's past that edge.

Like this...

So you're left with the triangle piece (on the left in the pic below).
You can toss the extra bit that's on the right

Now draw your design. Try not to cut to far into the smallest angle (over there on the left in the picture below) because that will be the center of your flake. If you cut to far in, it will tend to fold in on itself. Keeping the center in tack will give you a strong flake. That's an oxymoron... but it's true.

I penciled in the areas that will be cut away.

Then cut, cut cut.

Once it's cut, slowly and carefully unfold the paper.

Be sure to press down on the seems as you open it.
It tends to want to fold back up on it's own.

Once it's open, you can place each flake in between the pages of a big, heavy book to get them super flat.

Then string them along a piece of fishing line or floss across the ceiling or tape them to your window.
--------------------------------------------------------------------------------------------------
Wondering what designs I made to get the flakes in the collage pic up top?
Well wonder no more!
Here's the folded, cut piece (above) along with the open design (below)...


Now that I've completely overloaded you with paper cutting, go make some flakes and decorate.
Comments
Post a Comment